![]()

Press view button while a scene is selected will glue all last takes of all shots in that scene together and play it. Press view while a film is selected will glue all scenes in that film together.
Pressing enter/middle button on a film, scene or shot will take you to a multitrack dub settings menu. Here you can press record to begin a new audio dub track, you can have as many dub tracks as you need. Next time you view your shot, scene or film it will be mixed in.

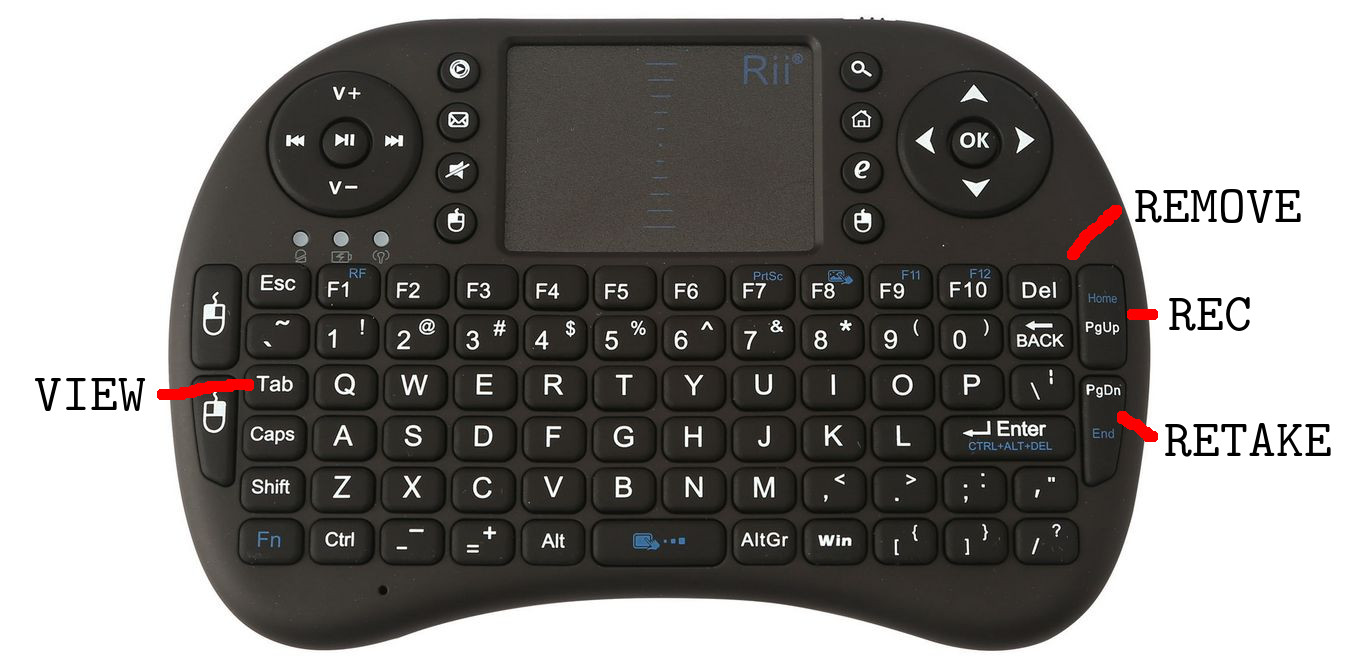
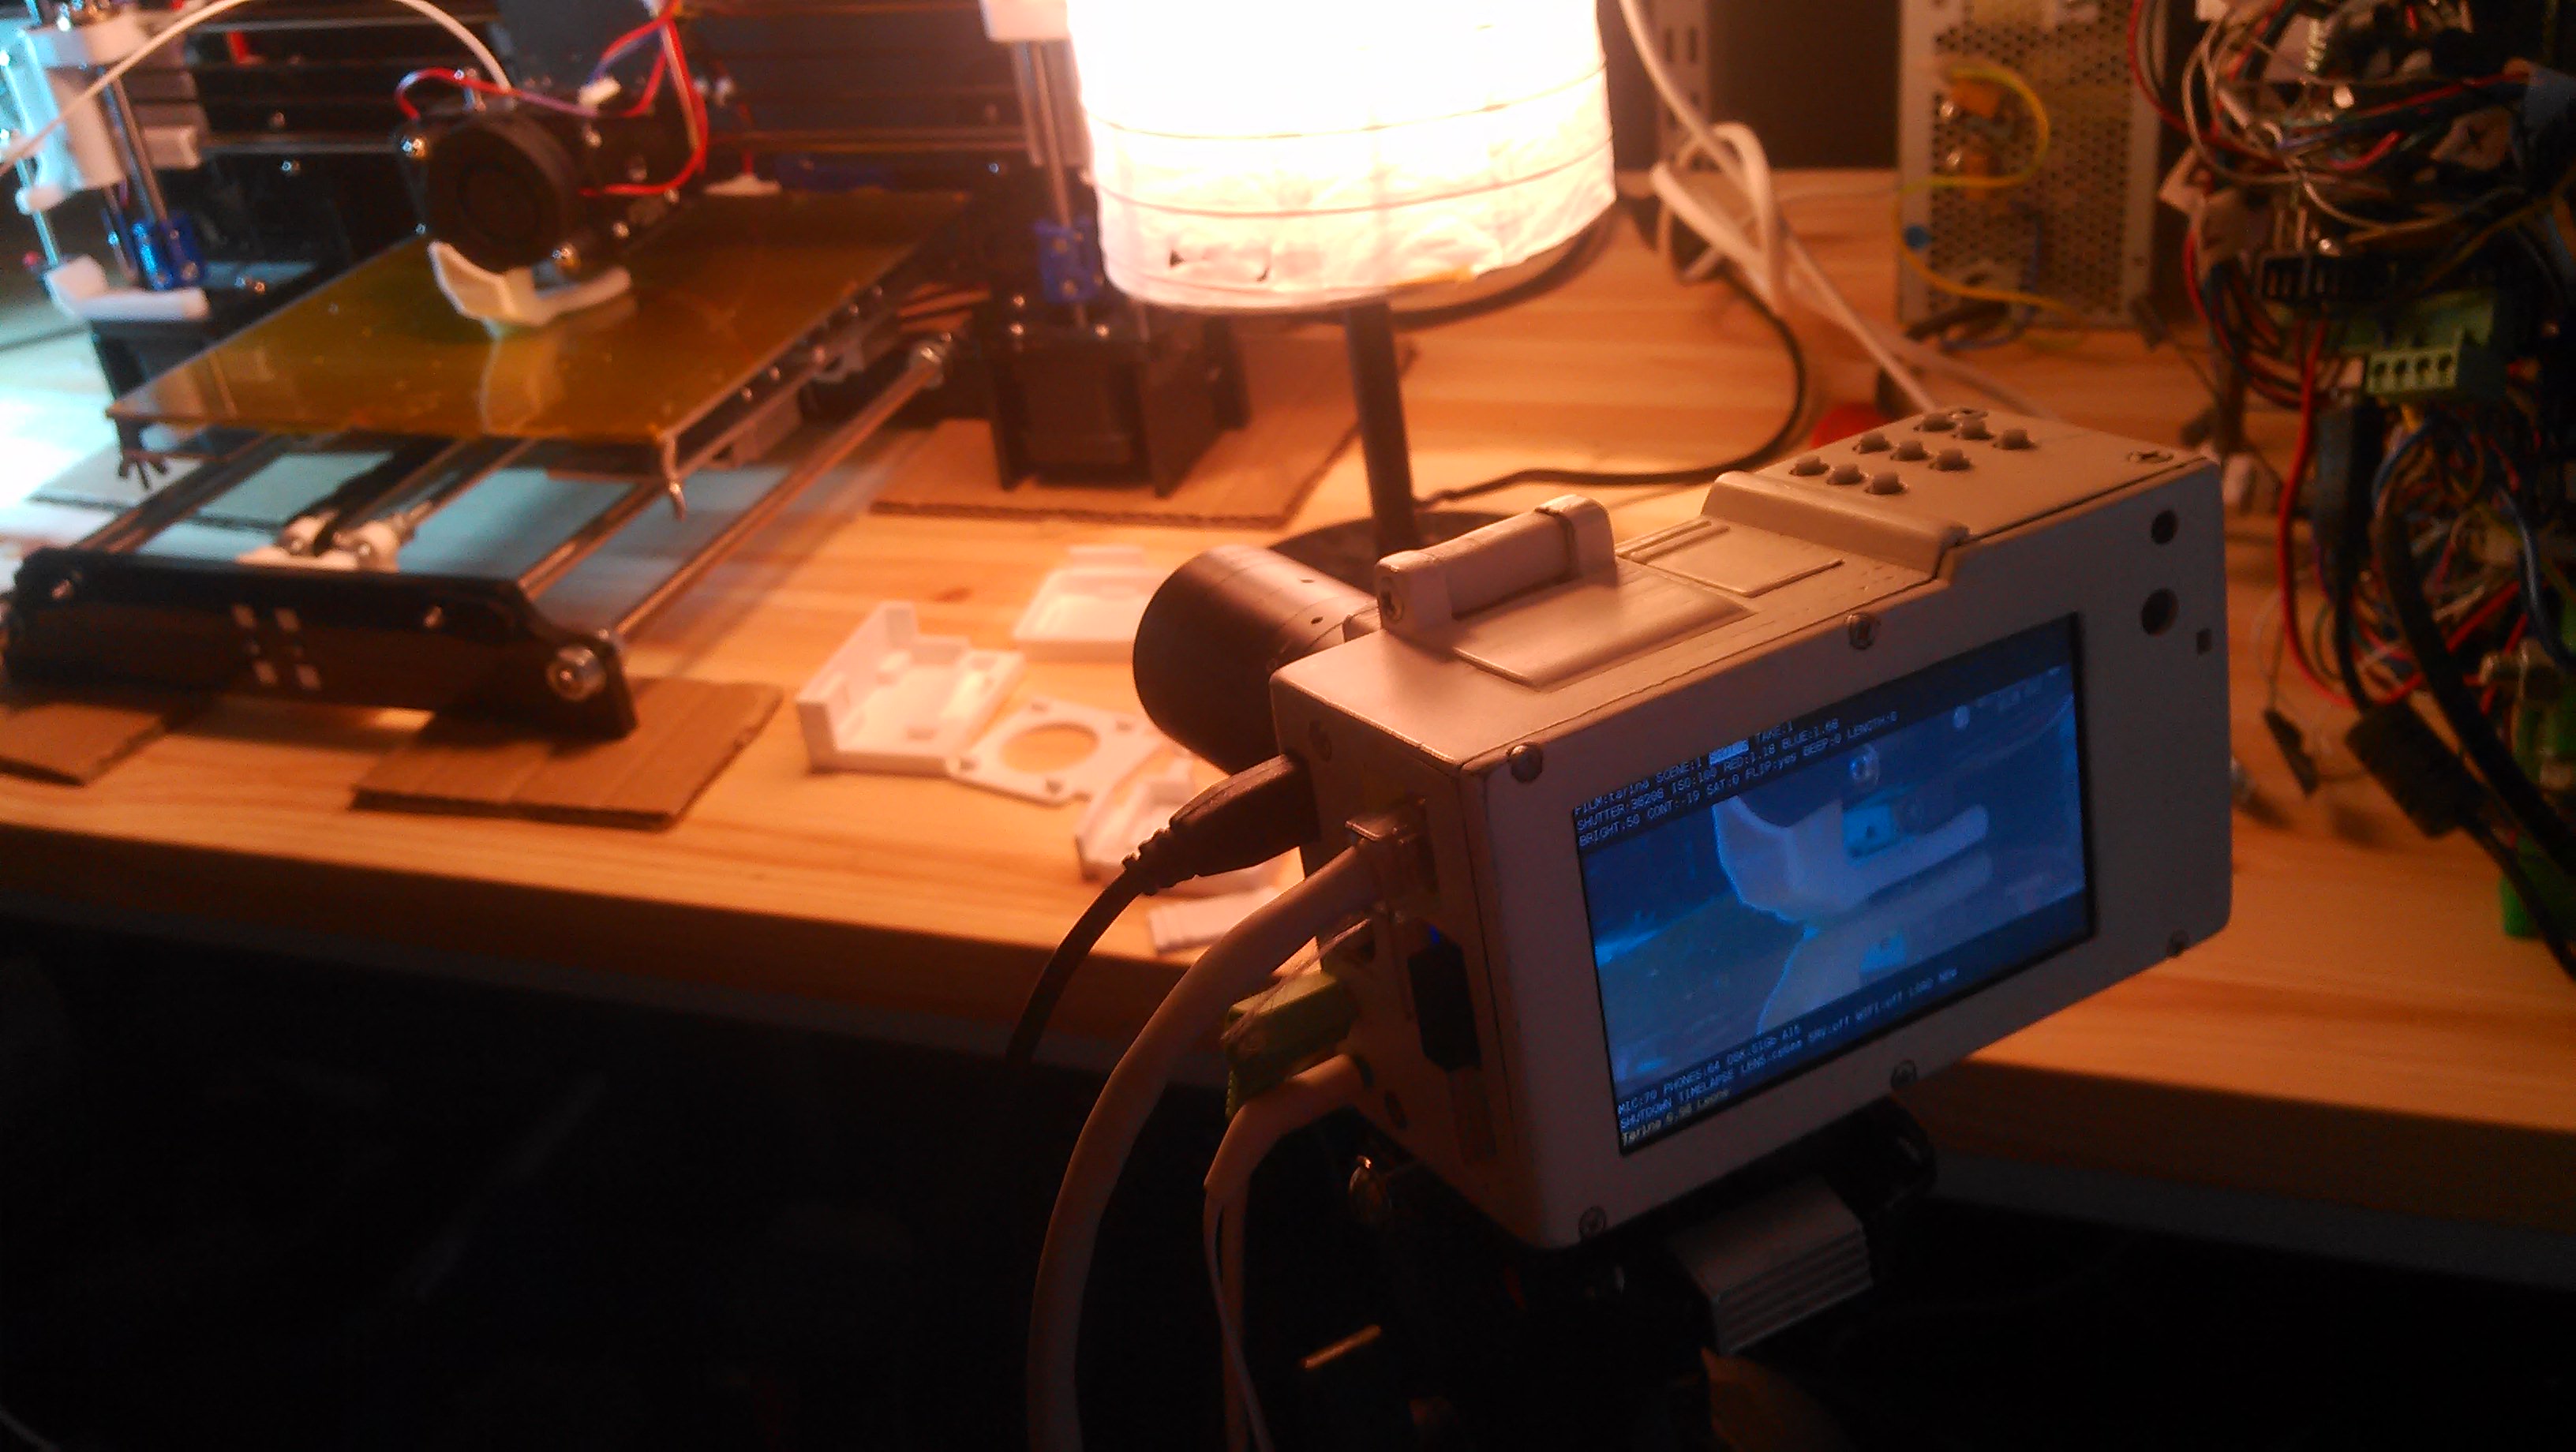
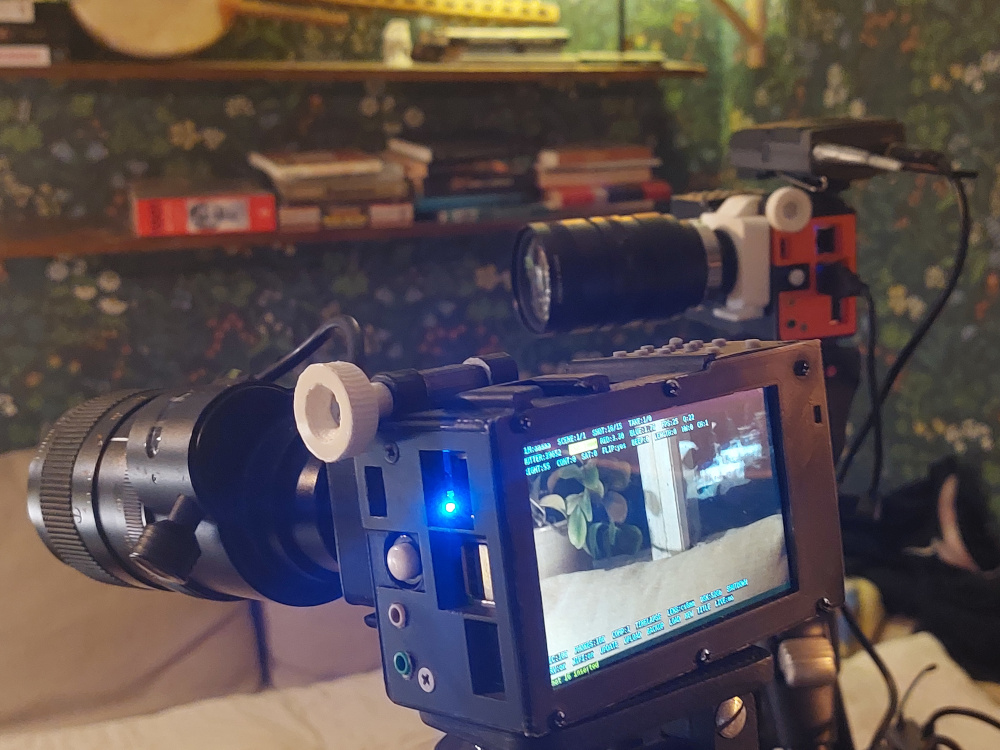
Control the GonzoPi with a keyboard or through the network or with physical buttons; Enter, Up, Down, Left, Right, Record, Retake, View and Remove.
After recording, press record to make next shot or press retake and you’ll be filming a new take, the last take in a shot is chosen when viewing a scene or the whole film. Hint! pressing record while browsing existing takes, shots and scenes will take you to the last shot in that scene. Pressing retake will do just that, a retake. Makes perfectly sense, right? Fiddle around with it, you’ll totally get it.

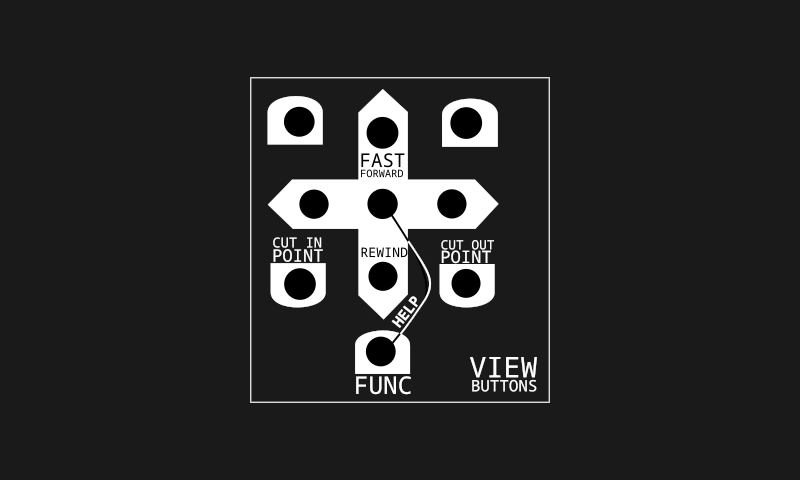
With keys up and down you change a specific setting, for example shutter speed. With keys left and right you change what settings to change. With view, you can view the last shot or if you have a specific scene highlighted the camera would automatically glue all shots together and play that scene for you, same goes for film. With remove you can remove a specific take, shot, scene or film. With the retake button you retake a bad take, this is how the camera keeps track of your good takes. The last take is always the chosen one.
Special keys on the keyboard (CAPITAL):
H = Hide / Show Help
C = Copy scene/shot
M = Move (as in cut and paste) scene/shot
I = Insert empty, copied or cut scene/shot
S = Screen On / Off
Spacebar / PageUp = Rec / Stop
PageDown = Retake
Tab = View
A = Hide / Show Menu
A short explanation of all the settings and why they are where they are.
The idea of the workflow is: film only the essential, you can merge your shots of a scene and view it on the spot and do a retake if you need to fix something rather than filming a bunch and fixing it later while editing. When you get the hang of it there won’t be not much editing later.
If you press enter while you’ve highlighted the film name or a scene you’ll be entering dub settings menu. (ADD:d:1.0/o:1.0) this indicates the volume of the (d)ub to the previous (o)riginal mix. So, for example if you want the dub volume to be 50% of the previous audio, the settings would look like this (ADD:d:0.5/o:1.0). A good all-around background music volume level is only 10% so it would look like this (ADD:d:0.1/o:1.0). The other setting is fade in and out in seconds (in: 0.5) (out: 1.0) whould be half a second in and a second out. Now if you press enter while the ADD is highlighted you’ll be dubbing. You can change the settings later if you come back to the menu.
Shutter and iso are well know basic camera concepts. With red and blue you control the colors. If you press enter while on any of these then it will go into auto mode and if you press it again it will go back to manual mode with the current auto settings. I’m using this feature to quickly find a reasonable good value before I’m locking and tuning the settings manually to my likings. Cuz you always will know better than the robots!
Color grade on the go with brightness, contrast and saturation. You will probably have to play with theses to figure out what you want. Remember that as you’re making your film ready while you’re shooting it take by take, there’s no color grading later on so you’ll have to settle on your color grade before you film. To get that good old spaghetti western look go with the contrast at -19.
If you go gonzo, flippin it is the way to go! beep is a countdown timer from the moment you press rec or retake to when it actually starts filming. Lenght let’s you put in the lenght of your take before you actually start filming. Both of these are very useful if you film action alone and can’t reach for the buttons.
Control teh level of your mic and headphones. Comp is a basic compressor so your message comes across and we hear ya! it’s quite harsh at the moment but I like it when it goes craking up abit like in the good old 70s cinema.
Do a timelapse when you need to tell about time. There’s an under menu here where you can choose the intervall of the takes, now this isn’t really a traditional timelapse, it will instead do a 0.2 sec video at each intervall or it can be set to your likings but 0.2 is good for a traditional timelapse effect. At the bottom of the screen is a calculation of how long the clip will be if you do the timelapse for an hour. I’d say don’t over do it! a 10 - 20 sec clip is already quite a stretch but its up to you, you’re the movie film director.
Disk space, showing you how much of space left on your sd card. Shutdown, when your really done! it’s good to do this before cutting the power or otherwise there’s a small chance of sd card corruption. Srv is a network server, if your connected to a network and put this on you should be able to go to any browser on any device and watch your movie films (that is if you’ve rendered them first), just go to http://gonzopi.local or it might be that you have to know the ip address of your gonzopi (you’ll find it when you’ve connected it. Press enter on wifi. There it is on the bottom of the screen, looks like this 192.168.1.105). If you press enter on wifi you will be transported to a glorious program called Wicd curses, here you really need to have a keyboard to set up your connections. Hints are down on the screen what buttons to press. To get back into Gonzopi press “q”.
Update the camera to the most exclusive version, this is still pretty much a-work-in-progress and as a warnign expect some bugs! don’t worry I’ll be improving things but it takes time. Upload your film to the web, there is a youtube uploader mod you can install but you’ll have to do some configs to make it work for you. Details coming soon. Reach out to the matrix room if you’re in a hurry..
to get the youtube api secrets wget https://gonzopi.org/yt/.client_secrets.json
It’s good to always backup your stuff! Plug in your usb drive and just press enter and sit back and relax as the wonderful work of computer copying does the magic. While you’re at it open a beer cuz it can take quite a while if you got much stuff on there. Now, this should be working on almost all hard drives but there are some that still use a very old file system called fat, and its as lazy as its given name and doesnt store critical information we would want, because we want the copying to only copy our new takes or retakes. So please use new drives like ntfs systems or ext or whatever they all are called. You’ll find all your takes even the shitty ones on your harddrive in a directory called /gonzopifilms/. One more thing, there are some drives that are very power hungry and doesnt come with it’s own power source, now these drives are very bad for this particular use because the Gonzopi has limited amounts of power for usb use, so to be sure it’s gonna work, use powered hard drives that has got a power cord.
You can have many on going films, load em up or start as many films as you like.

Here is a list of parts that will work, there are other parts that probably will work but requires some hacking.
Price ~30 eur
The heart of Gonzopi. Why Raspberry pi you ask? There are several reasons:
The 3B+ is too powerhungry for the Powerbooster 1000C thats why I went with 3B
Links Raspberry pi site Buy Aliexpress
Price ~10 eur
This is a good performance card.
Price ~60 eur
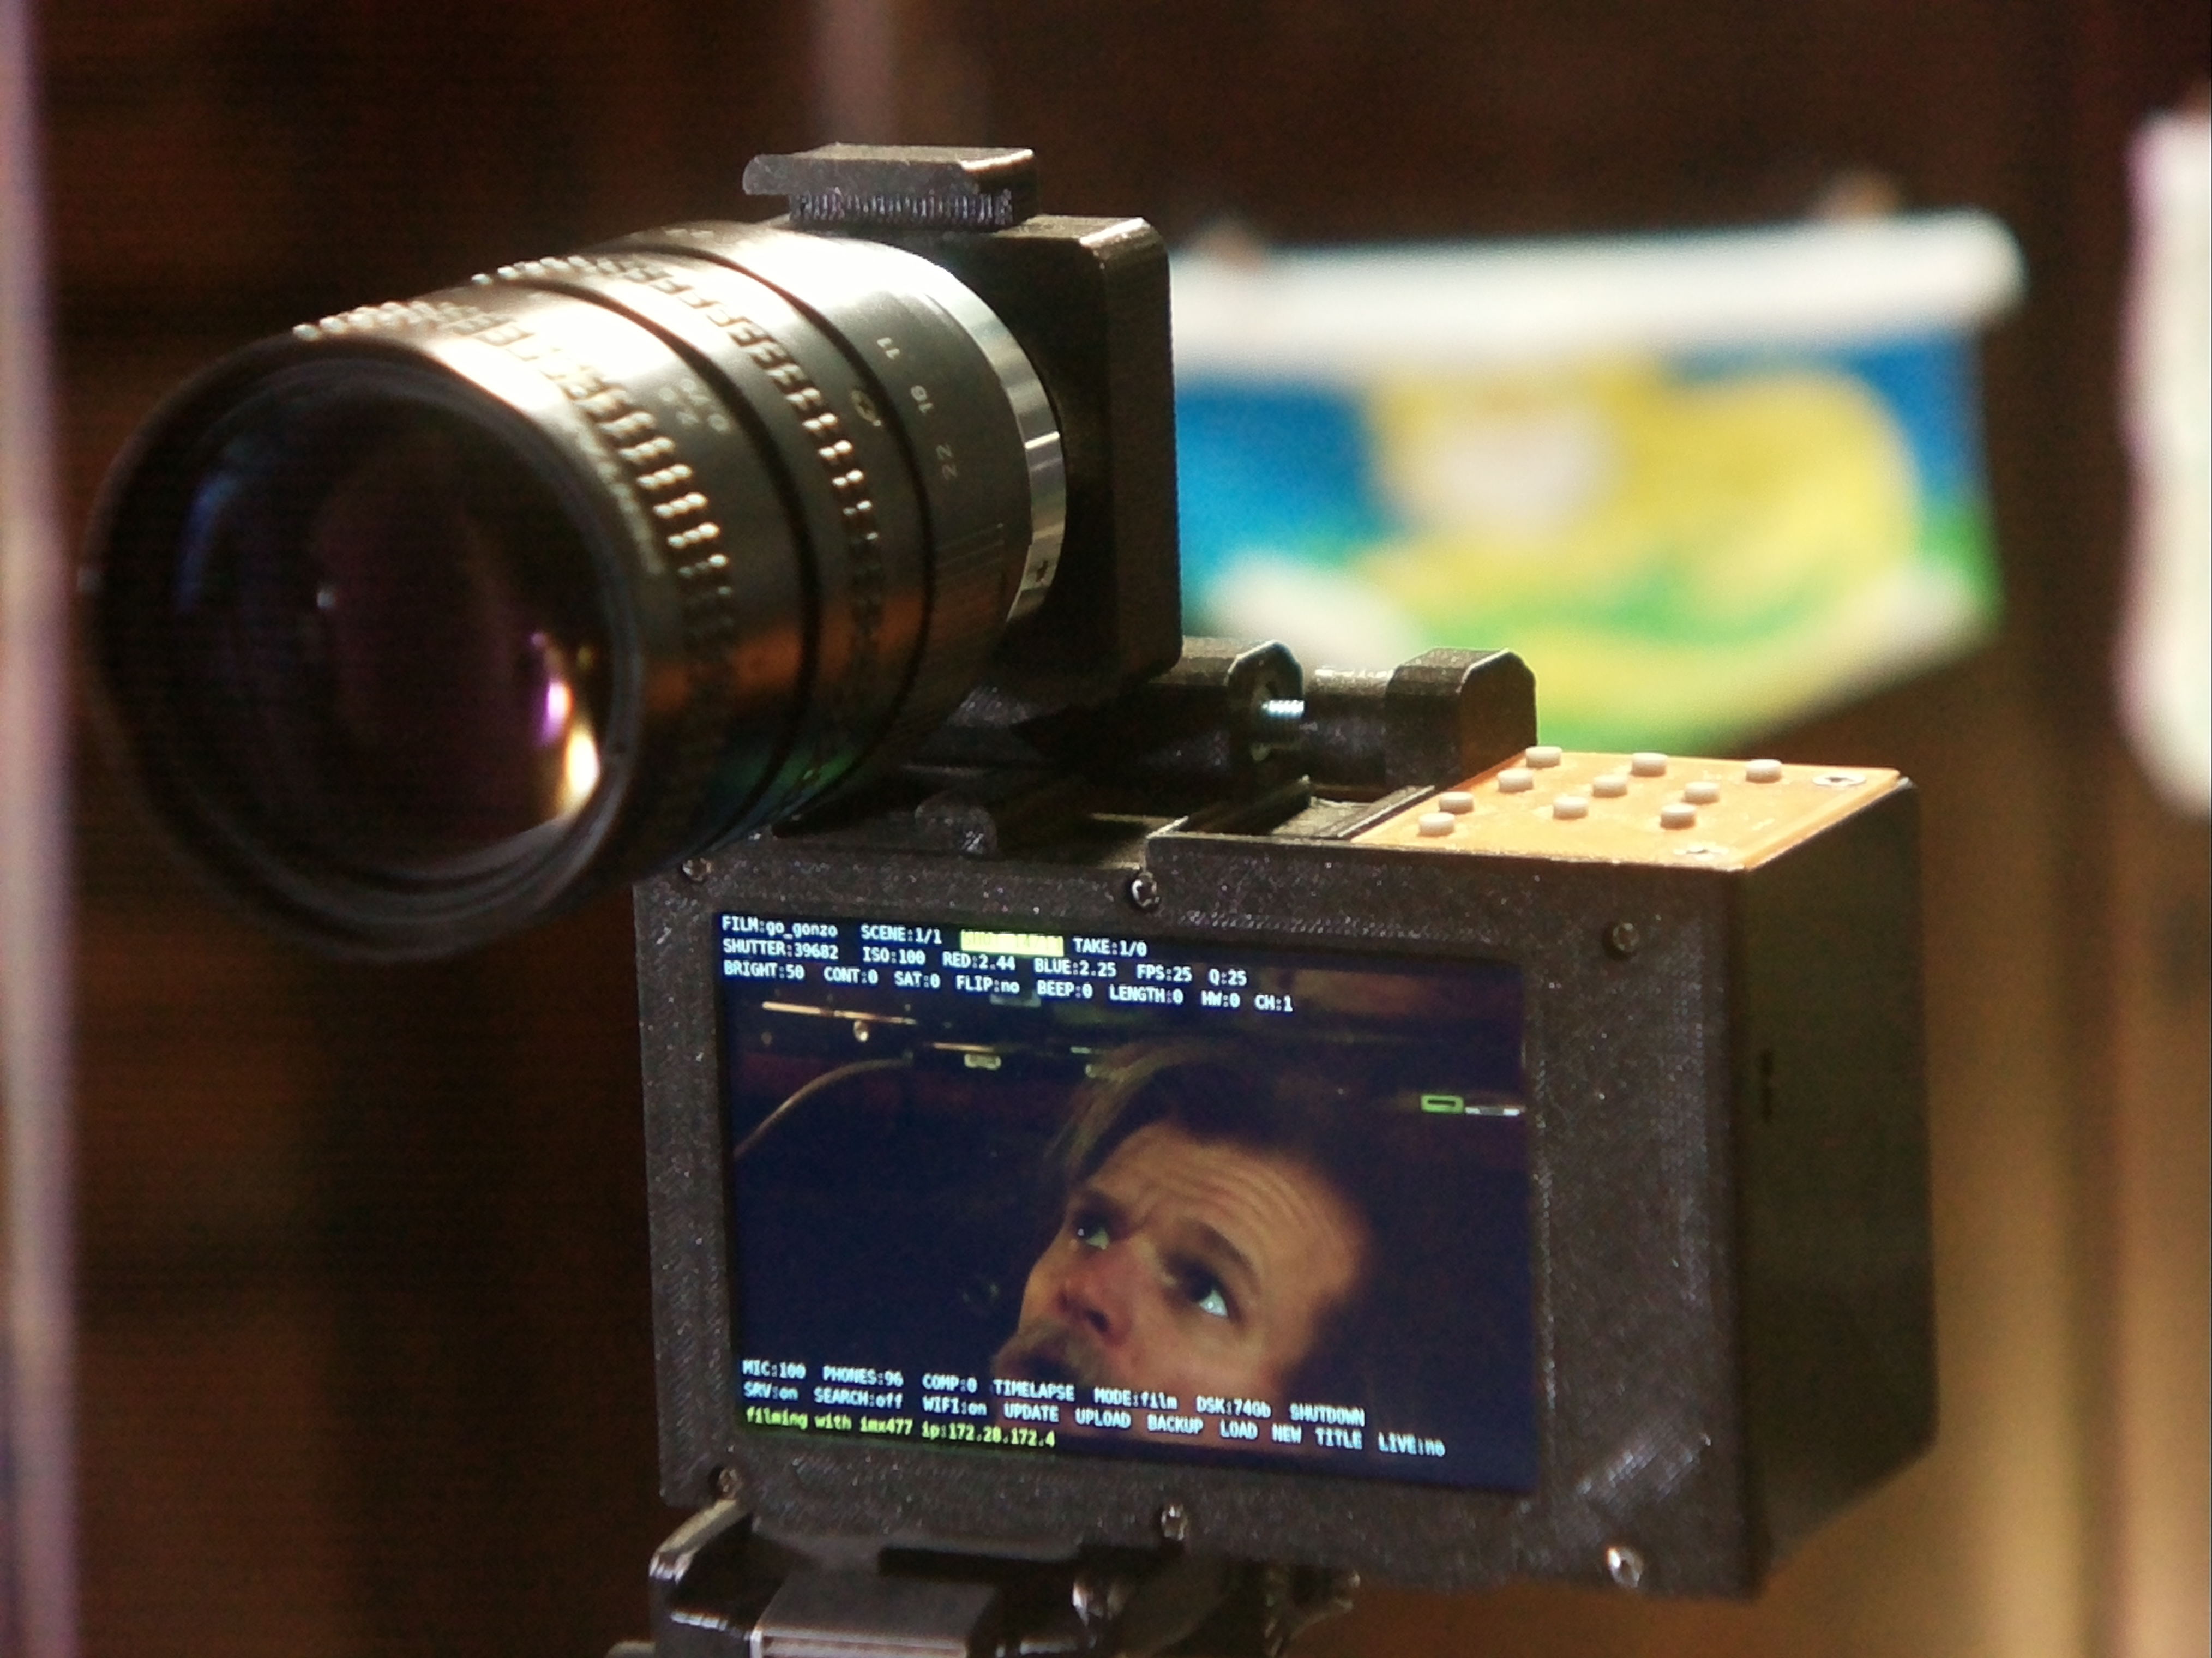
This is the recommended camera module for Gonzopi, 12.3 megapixel Sony IMX477 sensor, 7.9mm diagonal image size, and back-illuminated sensor architecture, with adjustable back focus and support for C- and CS-mount lenses.
Links Buy Raspberry pi
Price ~30 eur
This module and lens gives good hd video quality with the ability to manually focus and replace lenses. See tested lenses down below.
Price ~35 eur
Bright 4 inch responsible screen. Beware when installing the screen, it’s quite britle!
Links Pimoroni Buy Pimoroni Farnell
Price ~35 eur
Best 3.5 inch screen that I could find. Features worth mentioning:
This is not a touchscreen but I dont think touchscreens are good for cameras anyway.
Links Raspberrypiwiki Buy Aliexpress
Price ~1 eur
Really cheap usb soundcard. It has been working suprisingly well. Have not tested other cards yet.
Buy Aliexpress
Price ~17 eur
I have tried several batteries, the adafruit 6800mAh is also fine.
Buy Aliexpress
Or you can buy 3 pcs of 3.7V 18650 Lithium cells and protect them with an Lithium Battery Protection Board Overcharge Over-discharge.
Here’s a pack with 40 pcs of 2600mAh 3.7V 18650 cells.
Price ~2€
Enough juice in this booster charger to run teh pi 3b without dropping voltage.
Buy Ebay
Price ~23 eur
Seems to be dropping voltage every now and then resulting in dropped frames. Check the Type-C power booster.
Links Adafruit Buy Ebay Aliexpress
Price ~2 eur/20 pcs
You can only buy a pack of 20 pcs but these buttons are good and silent! Not necessary if you want to control with keyboard like Rii mini 8+
Buy Ebay Aliexpress
Price ~1 eur
This will be connected to the screen I2C port. This is not necessary if you intend to control the camera with a keyboard like the Rii mini i8+
Buy Aliexpress
Price ~0.20 eur/pcs
PCB board to solder all connections on the MCP23017-E/SP
Buy Aliexpress
Price ~1 eur
Very useful for timing shots!
Buy Aliexpress
Price ~1 eur/10 pcs
This serves as the microphone and screen on/off button
Buy Aliexpress
Price ~5 eur/24 pcs
I use this as the powerbutton. I have tried different versions of safe shutdown buttons for the Raspberry pi but they have not worked as I wanted (they draw power even when Pi is powered off, this is not good). I have solved the problem with a menu button to safely shut down the camera.
Buy Aliexpress
Price ~2 eur/10 pcs
This is the standard camera stand nuts. If you never use a stand then you dont need this.
Buy Ebay
Price ~2 eur
This makes suprisingly good sounding sound! The original piece that I used is out of production, I have now found a similar module but I need to change the 3d module a little bit because the new module is alot smaller which is good. Need to test these new ones!
Buy Aliexpress (out of stock) Ebay (out of stock)
New module (still untested) Aliexpress Bigger electrec mics (if needed) Aliexpress
Price ~1 eur/10 pcs
Microphone input.
Buy Ebay
Price ~2 eur/10 pcs
Microphone batteries
Buy Aliexpress
Price ~2 eur/25 pcs
These hold the camera together.
Buy Your local harware store
Price ~2 eur/30 pcs
These hold picamera-body to the body.
Buy Ebay
Price ~1 eur/20 pcs
These hold the camera/mic together.
Buy Ebay
Price ~1 eur/pcs
We only need the metal parts from these, if you have som thin metal you could cut these yourself.
Buy Aliexpress
Price ~1 eur
From microphone to mic-in.
Buy Aliexpress
Price ~17 eur
Wireless control over camera. You will also need this for wifi settings etc. (Recommended) This is one of the best mini keyboards I’ve tried.
Buy Aliexpress
Parts grand total ~200 eur
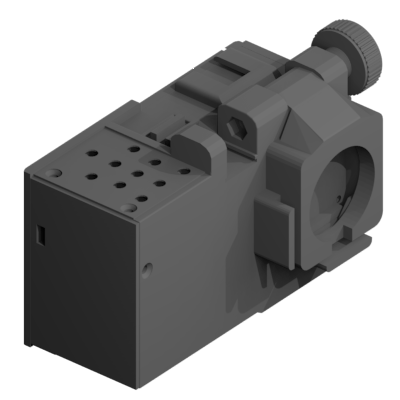
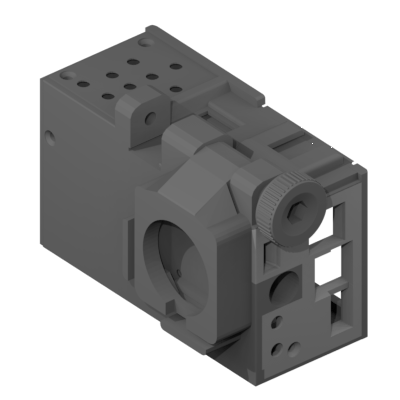
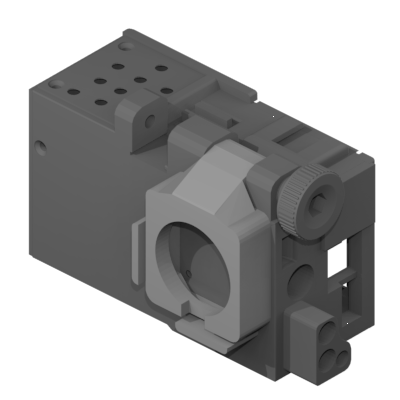
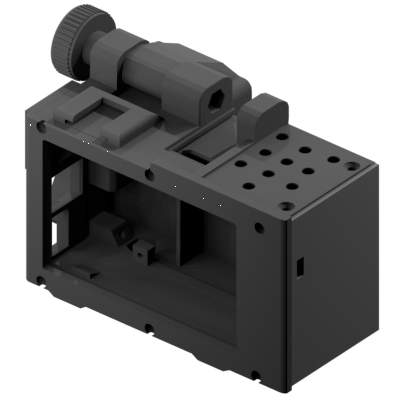
This is a 3.5 inch viewfinder for Gonzopi that you can 3d print and make by buying these three parts.
Price ~10 eur
Buy Aliexpress
Price ~4 eur
Buy Aliexpress
Price ~3 eur 10 pcs
Buy Aliexpress
While waiting for ordered parts lets 3d print the rest of the parts. I recommend printing with a solid 100% infill. Now it is pretty crucial that you have a good calibrated printer so that you don’t over/under print. Some parts need to be very precise to work.
You’ll find all the 3d parts in a blender file in the 3d folder.

gonzopi-button-plate-bottom.stl


Download latest Raspbian and follow install instructions. Ssh into Raspberry Pi and run:
Go to home folder
cd /home/piInstall git
sudo apt-get install gitGit clone gonzopi and then run install script with sudo:
git clone https://github.com/rbckman/gonzopi.git
cd gonzopi
sudo ./install.sh
You’r ready to rumble:
python3 gonzopi.pyHappy filming!
Here is what I’m testing right now.
Price ~ 6 €
This is a good wide all around lens. Recomended! Aliexpress
Price ~ 6 €
This is an even wider lens. Seems to be the same manufacterer. Aliexpress
This lens is good. Will write a longer review once I have more filming hours.